
Thread insert for wood
To obtain a metric thread in wood, there are several ways to do this. Here we would like to present the two most common methods of obtaining a stable thread easily and quickly.
- Drive-in nuts for wood
- Screw-in nuts or thread insert for wood
Drive-in nut for wood
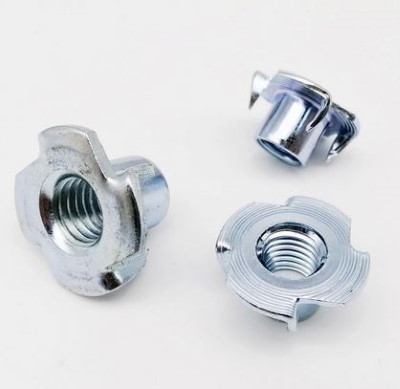
A very simple and quick way to obtain a thread in a wooden workpiece is the drive-in nut. As the name suggests, the nut is simply hammered into a prepared hole in the workpiece. The drill hole should be exactly as large as the core dimension of the drive-in nut. You can easily determine the core dimension for the drill hole yourself using a caliper gauge or by following the manufacturer's specifications. After hammering in the nut, the thread is ready for use.
Tip: The drill hole should be slightly countersunk before hammering in the nut; this makes it easier to apply and hammer in the nut.
Screw-in nut for wood / threaded insert for wood

A very good method to obtain a very stable and strong thread in wood is the use of a screw-in nut also called thread insert for wood. These nuts are available in different sizes from M4 to M10. The thread insert has a cylindrical shape and consists of a self-tapping external thread for wood and a metric internal thread for metric screws. For screwing into the workpiece, the thread insert is equipped with a slot or with an Allen socket (hexagon socket). With the latter, the processing and the vertical screwing in is much easier. There are also hexagon bit sets for the cordless screwdriver, so that the thread insert can be easily and quickly screwed in.
Tip: The drill hole should be countersunk before screwing in. The wood thread insert can then be screwed in more easily and accurately.
Assembly instruction
The installation of a threaded insert in a wooden workpiece is simple and can be done by anyone. It should be noted that you have to pre-drill slightly larger holes in hardwoods than in softwoods. However, you should always follow the instructions of the respective manufacturer. We recommend first on a piece of scrap wood that to test completely. If successful, you can use it one to one on your workpiece.
Step 1: Measure core hole diameter

The core hole diameter can either be determined by yourself. As shown in the picture on the left, this can be done most easily with a caliper gauge. Or, if available, you can follow the manufacturer's specifications.
Step 2: Drill the core hole
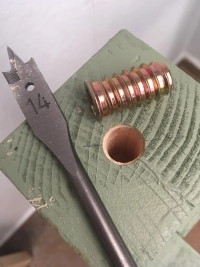
Drill the core hole for the thread insert. Attention! Make sure that you really drill at a 90° angle. Then slightly countersink the drill hole with a wood countersink. This facilitates the subsequent assembly.
Step 3: Mount thread insert
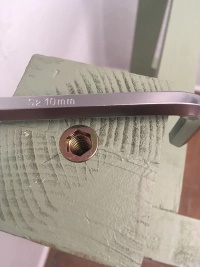
Screw in the thread insert with a hexagonal wrench at a 90° angle (you must work very precisely here) until it stops. Remove the hexagonal wrench and the thread in wood is ready.
The following topics may also be of interest to you: